Leveraging a Linux VM inside Microsoft Windows
2018-07-11Some time ago at work I was transferred to a project dealing with building mobile apps in Unity (the game engine). Since the rest of the team was using Microsoft Windows, along with a couple of Windows-only tools (such as Visual Studio and ReSharper), not to mention the fact that Unity Editor for Linux is still marked as "experimental" – I had to make the switch, too. Re-learning how to use Windows after spending almost a decade using Linux exclusively was a bit hard; even after getting used to all the quirks of the platform, there was one thing that I was missing sorely: the terminal. I played a bit with Git Bash, but found it a bit clunky to use, and most importantly – missing a lot of less-popular Unix tools. Dissatisfied, I set out to come up with something that'd be as close to my usual Linux-only workflow as possible.
I thought briefly about using a virtual machine, but using the tty from a VM management window is rather unwieldy. Wondering about the best course of action, I suddenly recalled Gynvael Coldwind's video about his Linux-inside-Windows setup. That was, in essence, what I wanted, so I decided to try and replicate that. As far as I could remember, it was mostly a matter of having an X11 server running on Windows and then using X11 forwarding over SSH to have Linux applications pop up on Windows. How hard could it be?
Installing required software
I started by installing required software on Windows, the three things being a VM hypervisor, an X11 server, and an SSH client.
VM Hypervisor
To run a virtual machine, I needed a hypervisor. I decided to go with VirtualBox, mostly because I had the opportunity to use it at work in a different project, so I was already a bit familiar with it. Installing VirtualBox is rather straight-forward, so there's not much need to cover it here.
X11 server
Not having any former experience in the subject, I searched through the interwebs for a bit. Eventually I decided to go with VcXsrv. There's also Xming, but since VcXsrv was more recently updated, and I didn't really have anything else to base my opinion on, I went with VcXsrv. Installation proved to be rather standard, and the default program configuration worked fine for me.
An SSH client
Even though apparently some sime ago a built-in SSH client was added to Windows, I didn't feel like experimenting with it, so I went with the Windows classic, PuTTY.
Setting up the virtual machine
Having installed all the required Windows software, I got about to setting up the Linux virtual machine. Since I'm a Fedora fanboy, I went with the latest release of Fedora Workstation – but if you want to try this yourself, you should be fine using any other distro. I configured the VM to some sensible settings, downloaded the Fedora install media, mounted it in the VM and ran the standard installation process.
After finishing the OS installation, the last two things to do inside the VM was getting its IP address and enabling sshd.
[user@fedora-vm ~]$ sudo su
[root@fedora-vm ~]# ip addr list
[root@fedora-vm ~]# systemctl enable --now sshd.service
Connecting via PuTTY
With the virtual machine being set up and the X11 server running, everything was in place, which meant it was time to check if this whole thing actually works. After firing PuTTY, I ventured through the settings until I found the option to enable X11 forwarding.
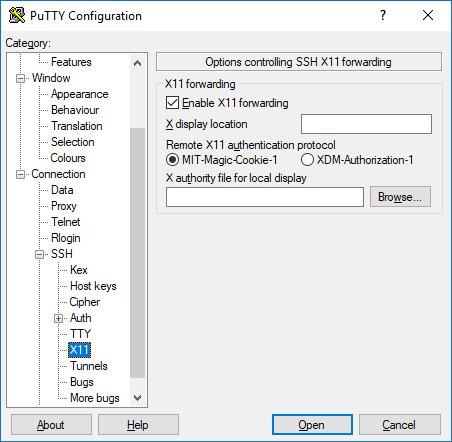
Having ticked the box, all that was left was to put in the IP address, click "connect", log in, and try to run a graphical Linux program.
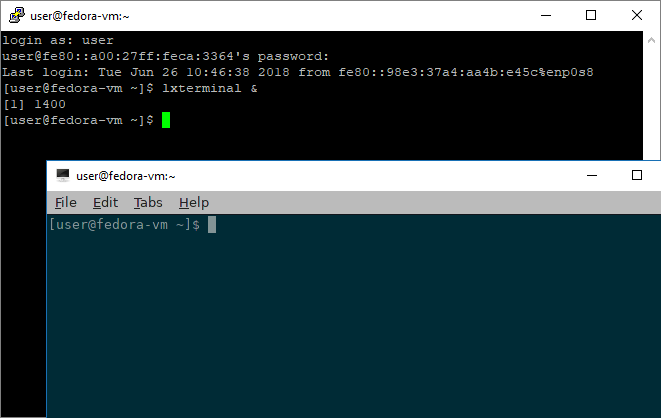
Hello! An LXTerminal window happily popped up in front of PuTTY. I felt at home.
Making the VM more comfortable to use
Even though the initial connection attempt was a success, there were still a few things that needed to be done in order to bring the setup to a comfortable, productivity-enhancing state.
Configuring drive sharing
Being able to run Linux programs in total isolation wasn't going to do me much good – I wanted to be able to use the two platforms to edit the same files. To achieve this, I first installed VirtualBox Guest Additions, which allows the system running inside the VM to use VirtualBox folder sharing features.
After that was done, I went into the VM settings and set up a shared folder.
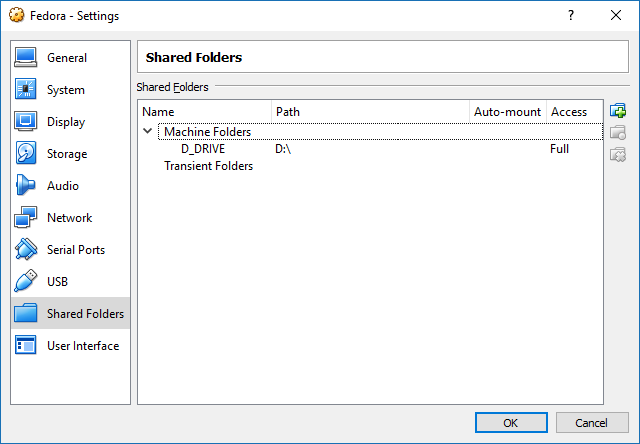
Once the folder was set, I could (after rebooting) mount it (as root) using the following command:
[root@fedora-vm ~]# mount -t vboxsf [-o OPTIONS] $SHARED_FOLDER $MOUNTPOINT...which was, of course, a very nice thing, but I'd like to have the drive automount. Though there is an "automount"
option in the Shared Folders dialog, the folders are, by default, mounted under /media/sf_${SHARED_FOLDER}.
This can be changed by editing the guest properties... but being the lazy bum that I am, instead of
digging through the VirtualBox configurations dialogs, I decided to write a systemd service.
[Unit]
Description=Mount VBox Host D:\ drive
After=network.target

[Service]
Type=oneshot
RemainAfterExit=true
ExecStart=/usr/bin/mount -t vboxsf D_DRIVE /d
ExecStop=/usr/bin/umount /d

[Install]
WantedBy=multi-user.target
This service, once enabled, will run when the system enters multi-user mode (so basically on every non-recovery-mode boot) and execute the mount command. I copied the service to the standard location and enabled it.
[root@fedora-vm ~]# cp ./mount-host-drive.service /usr/lib/systemd/user
[root@fedora-vm ~]# systemctl enable /usr/lib/systemd/user/mount-host-drive.service
Adding a host-only network adapter
One of the things that wasn't immediately obvious, but was a pain to deal with, was that the VM's address in the local
network changed on every boot. This made SSH'ing into the VM a bit tedious, since each time I had to first log in using
the tty and run ip addr list to learn the current address.
In order to fix this problem, I added a second network adapter to the VM and set it to host-only mode.
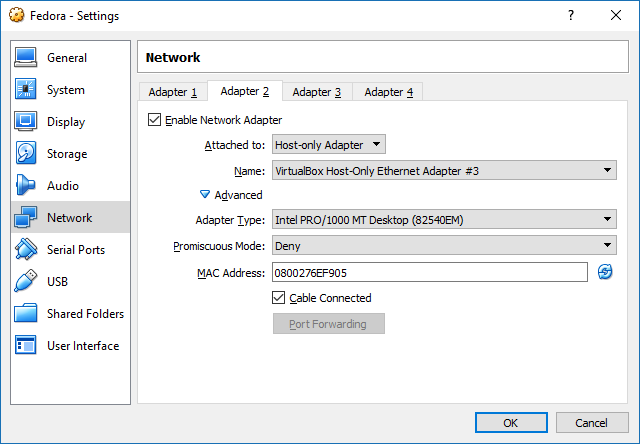
After rebooting the machine, the new network interface presented itself under the name of enp0s8.
All that was left was to configure it.
I headed over to /etc/sysconfig/network-scripts/ and created the ifcfg-enp0s8 script:
TYPE=Ethernet
IPV6INIT=yes
IPV6_AUTOCONF=no
IPV6_DEFROUTE=yes
IPV6_FAILURE_FATAL=yes
NAME=enp0s8
ONBOOT=yes
AUTOCONNECT_PRIORITY=-999
DEVICE=enp0s8
This ensured that the IPv6 address on the enp0s8 interface will not change between system reboots,
allowing me to save the connections settings in PuTTY, so I don't have to click through all the tabs
every time I want to connect to the virtual machine.
Getting audio to work
One minor thing that came up after some time was not being able to listen to audio from Linux programs. This turned out to be surprisingly easy to fix, as it was only a matter of actually starting the PulseAudio daemon:
[user@fedora-vm ~]$ pulseaudio --start -D >/dev/null &2>/dev/nullTo save myself from having to start the daemon manually every time, I went the lazy way and put it
in my user's ~/.bashrc file. This ensured that the daemon was started when I logged in via PuTTY and got my shell session.
Closing thoughts
While this setup was far from perfect, it was enough for my needs. There are, definitely, a couple ways it could be improved, such as:
-
Checking out the "seamless windows" function in VirtualBox, which supposedly does the whole X11 forwarding thing automagically.
-
Figuring out how to enable hardware acceleration inside the virtual machine, as applications utilising OpenGL either fail to run entirely, or look like a horrible, undecipherable mess.
- Using a less brain-dead solution for autostarting the PulseAudio daemon – maybe through
a systemd service, using
User=userto substitute the owner?
...and let's not forget the whole Windows Subsystem For Linux thing. Though initially limited to Ubuntu, it is now possible to install many other distros under Windows 10 – so maybe I should have actually checked out how it works first, before going on with the whole X11-over-SSH-to-VM route.
Comments
Do you have some interesting thoughts to share? You can comment by sending an e-mail to blog-comments@svgames.pl.